We are currently spending the winter as property managers on a lovely parcel in Uvita, Costa Rica. In exchange for housing, we have completed several projects on the property to improve the overall aesthetics and function of the space. The first major project we undertook was the construction of a compost shed that allowed us to consolidate three separate existing compost piles (that were soaked from the rain and not working as they should) into one convenient, covered location.
Luckily, there was a ton of material on the property when we got here. That, combined with the fact that the temporary rancho that was here fell over on our second day in town, meant we had plenty of opportunities to repurpose wood, concrete blocks, mortar, bolts, screws, and zinc roofing to create our upcycled DIY compost shed. The only thing we purchased for the construction was six bolts and a few additional screws for the roof. Without further ado, here’s how we created our upcycled DIY compost shed.
Step 1: Clear The Area
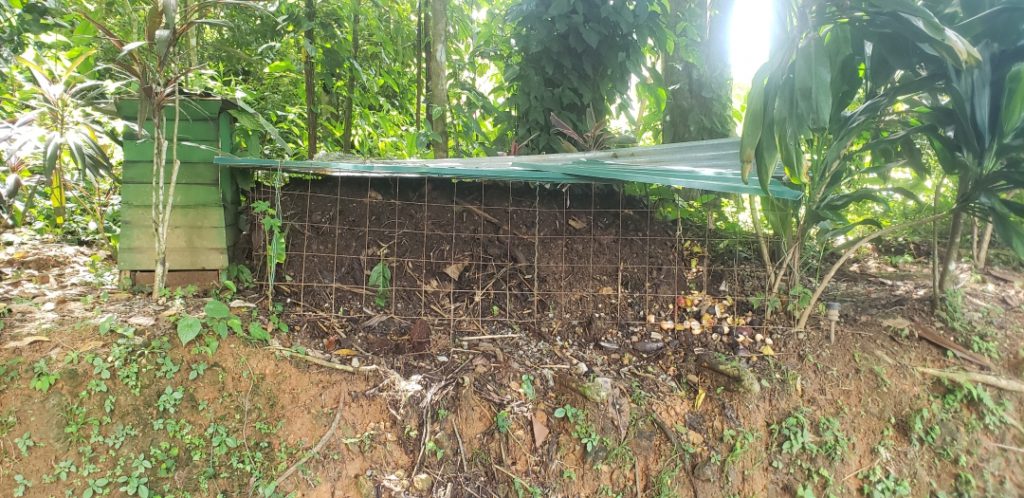
The obvious first step to building your own compost shed is to figure out where you want it. In our case, we decided to move all the compost into the forested side of the property. This served to keep it mostly out of the way for the comings and goings of our guests, as well as to place it in an area that already had more natural canopy protection from the rain.
Initially, I wanted to build a shed that was roughly 12 feet long, 4 feet wide, and roughly 5 feet tall. That initial design would’ve included three separate compartments for compost to be housed in. Because of the constrictions of the space in the area where we wanted to place it, however, I eventually decided to scale it down to just two compartments with final dimensions of 8′ L x 4′ W x 5′ H.
Once I had my initial drawings finished and the dimensions lined out, I set about clearing the space. In order to make plenty of room to work, I actually cleared an area that was roughly two feet longer (on each end) and 2 feet wider than the dimensions of the eventual structure I would be building. This gave me plenty of working space around the shed as it went up.
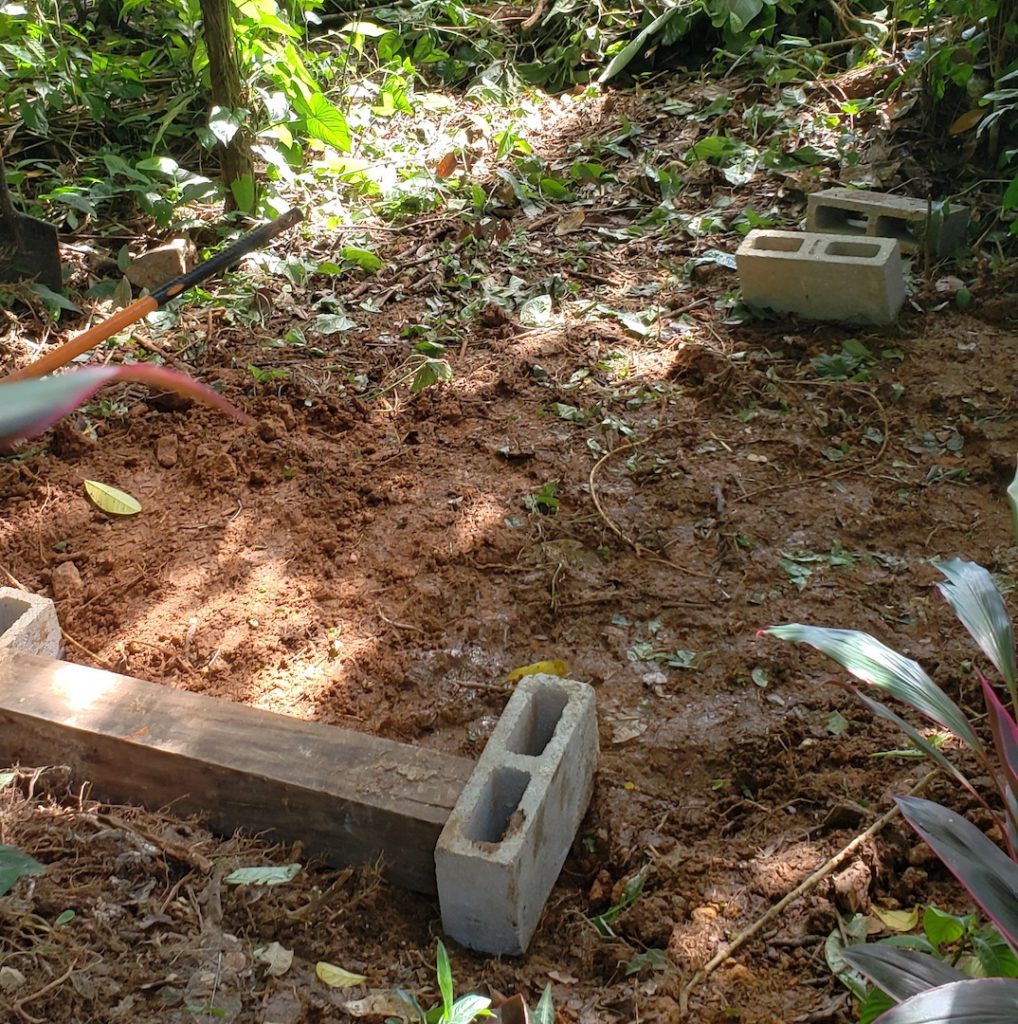
The most difficult aspect of this phase was the fact that we chose an area that was between two large trees. This meant that I ran into several root systems that I had to work around in the clearing process. In addition, I began clearing as the rainy season was just beginning to die down, so the soil was very wet, making digging a little more challenging. For anyone thinking of building their own DIY compost shed, I highly recommend starting construction when the soil is a little drier and easier to work with.
Step 2: Build a Foundation
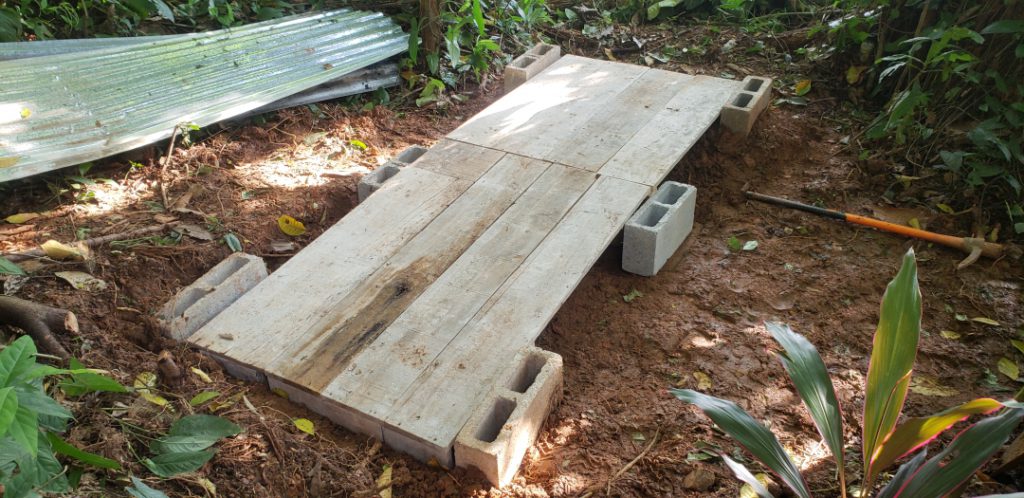
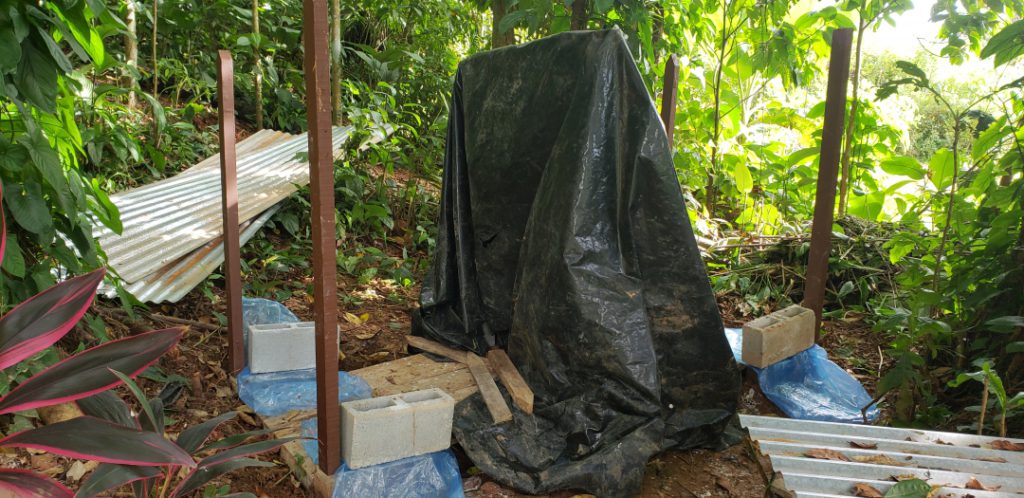
Once I had the space cleared, it was time to build a foundation. Because our compost was so saturated when I arrived on the property, I knew that airflow had to be a priority in the design of the new shed. As such, I strayed from the initial thoughts of pouring a solid concrete slab as a foundation and went for a different idea. This involved upcycling a few of the larger wooden platforms that were already on the property and securing them together to create a platform that totaled 8′ x 3′ in dimensions.
At either end of this platform (lengthwise), I set a large 6 x 6 wooden beam into the ground (at a level). These beams served to hold the platform up off the ground to provide airflow underneath the platform and two concrete blocks were placed underneath the center of the platform for additional support. Luckily, I was able to borrow a level from a neighbor and used a long piece of angle iron to measure the level between the two wooden beams before placing the platform on top and screwing it down.
Step 3: Set Your Footers
At this point, progress slowed for about two weeks. I covered the existing platform with two pieces of zinc roofing to keep them dry in the daily rains, but a combination of some heavy rains and my lack of clarity on the appropriate next step meant that not much else happened until I had a more firm idea of how exactly to set the footers in place. Fortunately, I reached out to my brother and father and the following idea was returned:
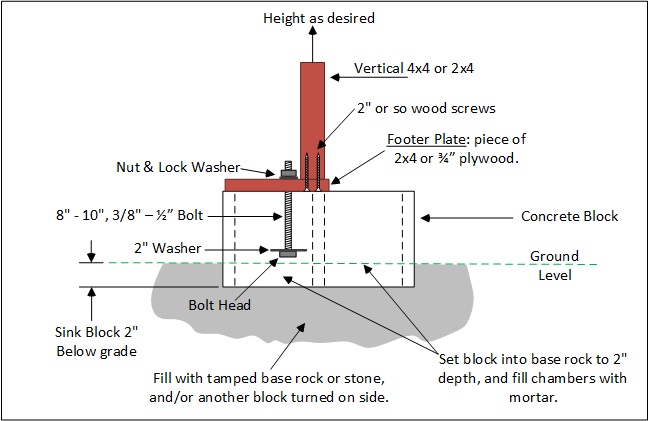
Working off of that model, I proceeded to dig the concrete blocks into the corner of the platform, butting them up against the ends of the wooden beams. I also placed two additional blocks at the center of the platform that would eventually hold the central vertical supports. In one hole of each concrete block, I pounded a three-foot section of angle iron that I had previously cut, sanded, and painted for the occasion.
Then, we mixed leftover mortar with leftover dried concrete mix that had been broken up and was easily harvested from the property’s driveway. After adding water and mixing for several minutes, we poured the mortar into each of the six concrete blocks one at a time, sinking the bolts into the mortar mix after each pour. We kept the flat braces attached to the bottoms of the vertical two-by-fours in place by placing an additional concrete block on top of each and we also covered each footer in plastic wrap to protect it while the mortar cured. This also served to keep excess water from dripping into the mix after it was poured. Once all six footers were poured, we allowed them to set up for three days before proceeding to the next step.
Step 4: Install Vertical Supports and Interior Features
Once the footers were adequately dried, I had to do a little more tinkering with the vertical supports. The great part about the design I used was that the vertical supports were completely removable even after the mortar was set. The bolt is literally the only thing left in place, so this compost shed can be stripped down and moved to a new location with minimal work.
Installing the vertical supports properly wasn’t all that tough. I simply had to remove the ones that needed additional cuts, cut them (by hand with a hacksaw mind you!), and replace them. Once again, I used a long piece of metal and laid it on top of the supports to guarantee as close to a level as possible. From here, it was time to dabble in a few of the small interior features that would make the compost shed functional.
Since my idea involved two compartments, I had to install a divider between the two. I wanted that divider to be removable, however, so I screwed two small pieces of wood into the inside of the central vertical supports to give the divider a way to slide down and set into place. Because I wanted to maintain the ability to move compost from one compartment to the other, I actually installed two separate central dividers, a larger one at the bottom (which stays in place 90% of the time) and a smaller one at the top which slides out of the way when you need to easily move compost between the two compartments.
At this point, I also placed lower angle-braces on all the vertical supports, using more leftover wood from the property. This was a challenge given the fact that I only had a hacksaw to work with, but I was able to use thinner pieces of wood as shims in cases where I wasn’t able to get the best angled cuts. The point was just to provide the vertical pieces with additional support against the wind, rain, and anything that might fall against the shed from the canopy above.
Step 5: Chicken Wire and Siding
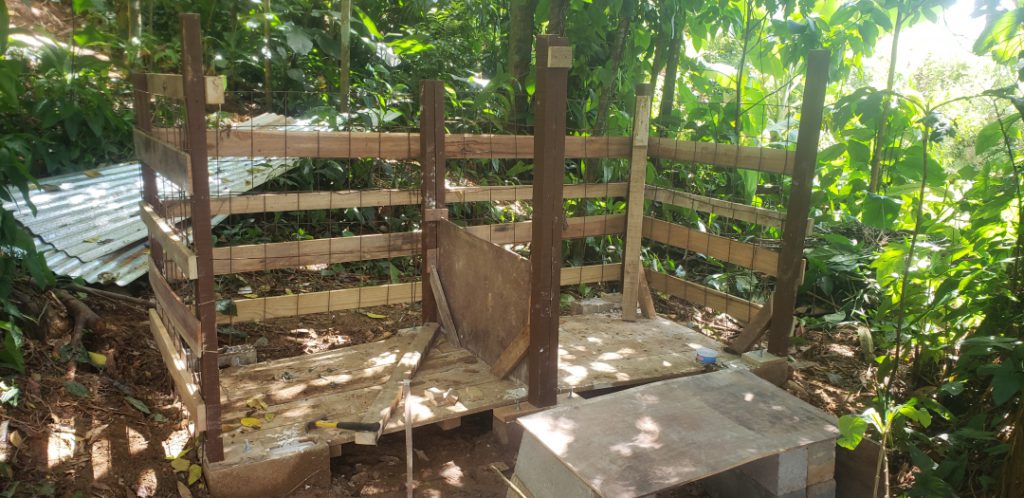
After the interior components were in place, I upcycled some leftover 3×3 chicken wire that had previously been used on the property’s compost piles to create the initial layer of the shed’s exterior. Once the wiring was set in place, horizontal wooden slats were screwed into the vertical supports to hold the chicken wire in place. I intentionally left space between the exterior horizontal slats in order to supply ample airflow to the piles that would eventually be placed inside.
Step 6: Roofing
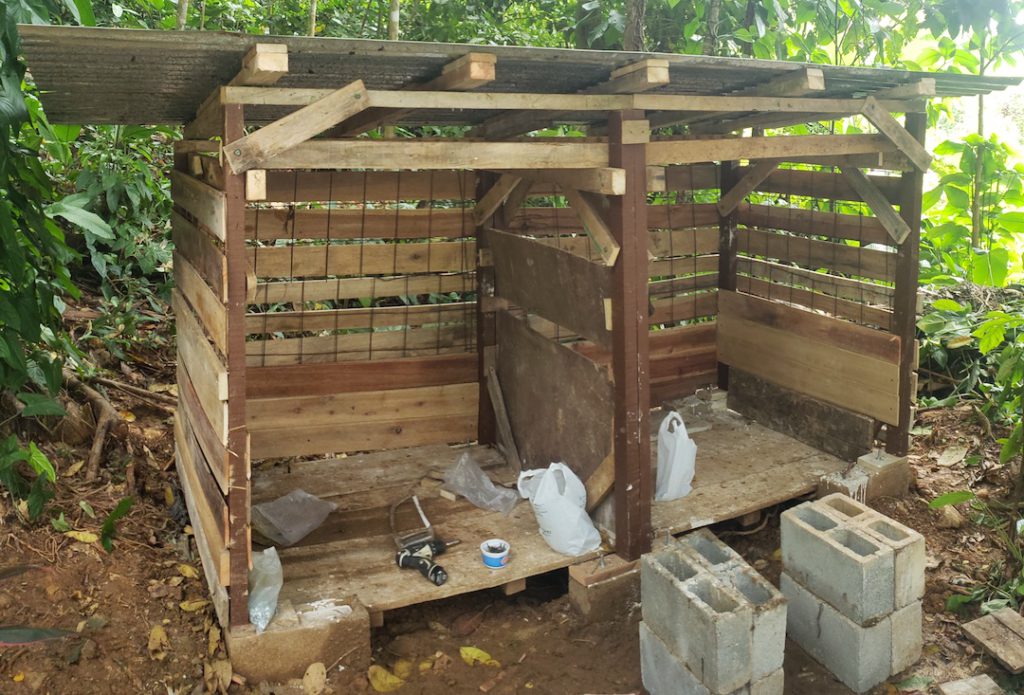
The next step was to get the roof ready for the leftover zinc roofing that came from the old rancho on the property. For starters, I bolted two-by-fours from the vertical supports at the back of the shed to those that would constitute the front. Then, I placed two-by-fours lengthwise on top of those two-by-fours (in the front of the shed), bolting them into the vertical supports as well. This created a rectangular frame which provided the first shear-strength for the structure.
Next, I bolted two-by-fours to the tops of the front and back vertical supports running lengthwise. It’s important to note here that the vertical supports in the front of the shed were roughly six inches longer than those in the back. This was done so that the eventual roof place on top would be slanted and account for the need for water runoff in the rainy season.
After the rectangular frame of the roof was in place, I ran four two-by-fours at an angle from the back of the structure to the front. These were bolted down into the two-by-fours at the front and the back of the structure to create a flat frame for the zinc roofing to lie on. Once the roof was framed in, I angle-braced all the upwards corners to give the entire structure additional shear strength and, finally, I installed two 12′ x 3′ zinc roofing sheets on and screwed them into the two-by-fours underneath, being careful to use rubber gaskets around the tops of the screws to prevent any unnecessary water leakage.
Step 7: Removable Front Slats

Once the roof was installed, the only remaining need was to close in the front so that we weren’t just dealing with an open shed all the time. However, I didn’t want to make anything that would be difficult to swing open or remove in order to work the compost. So, I eventually screwed four pieces of interior roofing slats together with a small piece of one-by-four. This constituted one front slat and I repeated the process to make six in total.
Then, I carefully cut 12 small pieces of wood into an L-shape and secured them to the front side of the vertical supports. This gave the front slats something to sit down into that would hold them in place but still make them easy to remove when ready to “work the pile.” Since I have replaced the wooden L-shape blocks with small pieces of angle metal and two-inch bolts that function to the same effect as the wooden cut-outs (but won’t break down as fast).
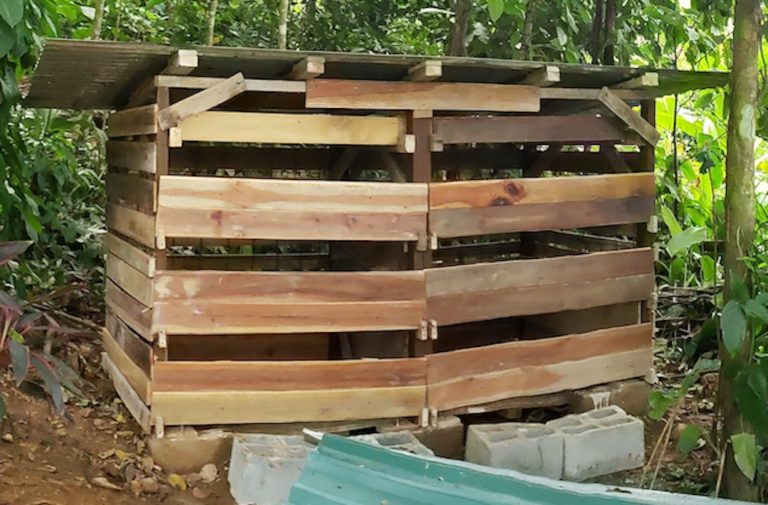
Build Your Own DIY Compost Shed!
And that’s our DIY compost shed process. We have since painted labels on the front slats to give it some character (Compost, Frescos, and Viejos, respectively) and will eventually sand and varnish the entire structure to weatherproof it before the start of the next rainy season. In time, I suspect the foundation platform may need to be sanded and varnished also if we wish to extend its life a little without pouring any additional concrete or mortar.
Since moving the compost into its new home, it dried out within weeks and has been used in two hugelkultur beds, six potted plants, and a planter box on the property. We have also gifted our neighbors with several wheelbarrow-loads of compost that they have used in their gardens and planter boxes. Using the fertilizer we’ve made in our new compost shed, we are currently growing papaya, black beans, two avocado trees, a lime tree, watermelon, sweet peppers, sweet potatoes, mint, a carrot, and a Guanacaste tree!
A Special Thanks!
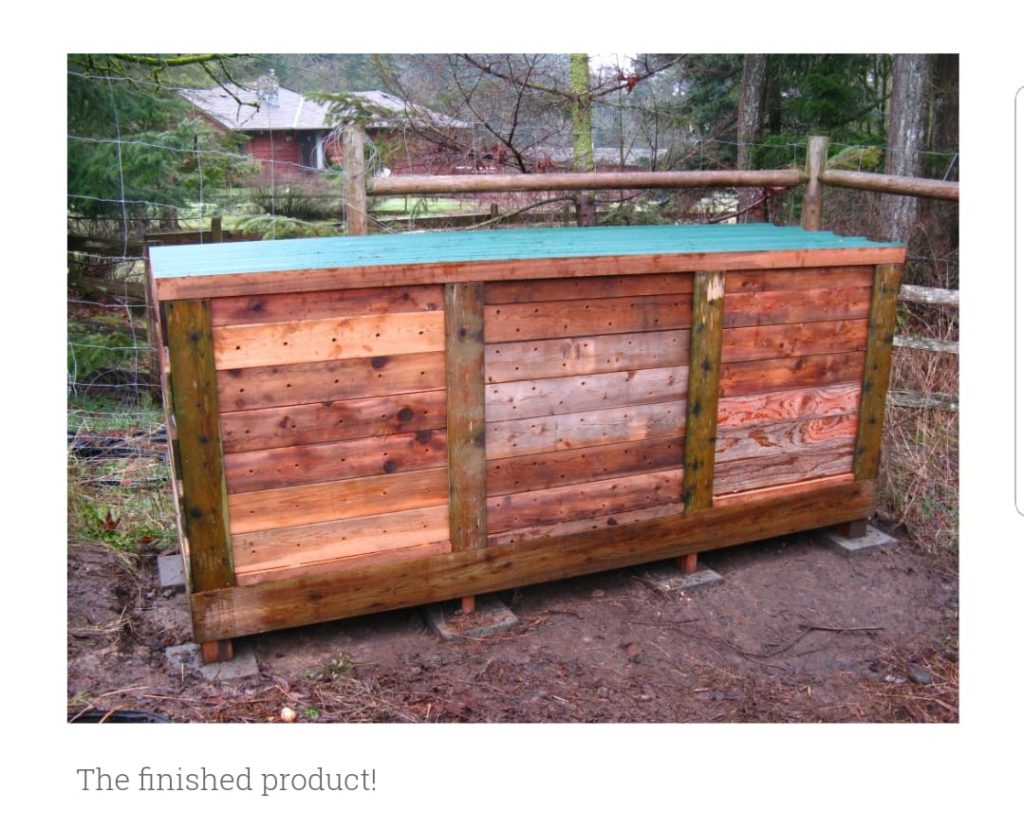
Before I wrap up this post, I’d like to say a special thanks to the folks at Backyard Feast, who gave me the idea for how to build our compost shed (even though our finished product turned out quite a bit different from what they have, which is pictured below!).
The Slow Life Guides
When we wrap up our time here in Costa Rica, we will be moving back stateside for the foreseeable future. After a spring road trip and some time in Lake Tahoe for the summer, we will be settling in Santa Cruz, California for the next four years as Katie pursues her degree in Traditional Chinese Medicine.
We would love an opportunity to help manage another Airbnb and work on property improvement projects like this one! If you’re interested in speaking to us about such an arrangement, shoot us an email to tucker@slowlifeguides.com or katie@slowlifeguides.com. We love the idea of leaving places better than we have found them and know that we can provide considerable value for the right property owner. If that’s you, we look forward to hearing from you!
Wow, you have made the compost shed both look and sound glamorous. This is an awesome post and the beautiful pictures make me want to take up tools now and start to build.
A compost heap is a great help both in fertilizing your garden and in getting rid of waste in an organic way. It’s all about recycling and saving our planet at the moment, so I am sure your post will be very popular worldwide.
Thanks Michel! It really was a fun project and I learned a lot in the process. Most importantly (as you mention), we were able to recycle and save a bunch of wood that otherwise would’ve ended up slowly decaying in a landfill somewhere!
Thanks for this, I have been looking for similar post over a while and none of the ones I read really gave a precise way to build it like you did. This really explained the details about constructions and the picture goes a long way to present the points accordingly. Great post, keep up the good works.
I’m glad you found it useful. I really did my best to take photos throughout the process so that I could illustrate it for my readers as well. If you decide to use some of these tips to create your own compost shed, I’d love an update to see how it turns out!
Hi,I am into organic vegetable farming and found your article very useful. I normally do my composting during the wet season so I can have something for the dry season. I love the way you laid out the floor plan. And thanks for the diagrams, it made understanding the article a lot easier. My composting shed are built without chicken wire mesh. I guess I would have to include that to my shed.
Awesome! I think the chicken wire was mainly to keep large pests out of the compost. Here in our part of Costa Rica, we have a lot of dogs that freely wander the neighborhood in search of food scraps. We also have our own pup that likes to sneak away and check out that week’s additions to the compost pile. So having a way to keep him out was mandatory. What kinds of vegetables do you grow?!
Hi Tucker, I envy you guys, sometimes it is great to make out time and spend it in a serene environment. Wow, the step 1 picture is truly an old pile like you rightly said. This is great. I love the way you started the chronological process of building the compost shed. And honestly, with your detailed article on how to build compost shed, one can actually carry it out. Congratulations on using your dried compost to grow papaya, black beans and the rest. I will love to see the pictures of these crops when next I visit your site. Thanks for teaching me the process of making my own compost shed.
Thanks for your comment Gracen! If you’re interested in seeing some photos of those crops after several months of growth, check out our latest article: How to Hügelkultur: A Step-by-Step Guide!
Hi there, thanks for sharing this step-by-step process of on how to build an upcycled DIY compost shed. I must commend your efforts for this wonderful article u have come up with. I have really learn a new thing reading through it and u have also added to my knowledge. Once, again, great work
You’re very welcome. If you use any of these ideas in your own composting or gardening efforts in the future, I’d love to know how they help!
Making a compost shed like this is a whole lot of fun. I remember how my dad used to make it when I was a little boy and no one actually thought him how to make a compost shed. He is just creative and does it perfectly. I have not tried it out on my own but am such a person that believes on myself. I know I can do it.
I know you can do it too! I had very, very little construction experience before launching into this project. I did a good amount of research and spoke to my brother and father (both of whom have more construction experience than I) about my thought process on several occasions. Little-by-little it came together beautifully!
Great piece and wonderful work.I actually downloaded a video sometime last year on this same topic, but yours is quite extensive. You covered everything on the topic.Let me ask, I saw that you perforated the shield, I guess it is for air passage. Is there another alternative to this method?Great piece
When you say the shield, do you mean the exterior of the compost shed?
The main motive for keeping the sides and front open was, indeed, to promote airflow. With the amount of rain we get here in the rainy season, I felt this was imperative to allow the compost to stay adequately dry.
Nice post. This is nothing but pure education about how to make this compost shed. I really had no idea how this would work out before. At the foundational level, is there any chance or possibility of using brick instead of wood for foundation? Because I am wondering what might actually be stronger than actually using the wooden foundation…
Thanks for the comment and great point that you make about the foundation! Because the compost on the property was so saturated when we first arrived, I really placed a priority on constructing the shed in ways that would promote maximum airflow. Recently, however, I have begun the process of reinforcing the shed’s foundation using concrete blocks and actually pouring a thin layer of concrete mortar in the bottom of both sides so that the foundation will hold up longer. Hope that answer is helpful!
The post is more useful and beneficial for those of us who live in the village. After reading the article, we could learn the proper use of household waste and garbage. Both DIY Compost Shed and Chicken Wire and Siding are profitable. This is very well explained by step-by-step description, pictures, and diagrams. Soon I will apply these at home. Thanks for highlighting such an excellent topic.
You’re very welcome! I’d love to see and/or hear how your own process of applying these ideas at home progresses!