
We had a trash problem on our property! As a result, I, for the first time in my life, had to figure out how to build a
Basurero translates directly to “dump” in English, but it’s the common term for where you put your trash out to be collected once a week here in Uvita. Because of the intense heat in the dry season and relentless rain in the rainy season, we felt it was necessary to keep our trash covered while it’s waiting to be picked up. In this article, I’ll walk through the very simple process I used to build a new basurero for our property and, in doing so, eliminate our trash problem!
Side note: Please take some time to learn about us and understand why we’ve created this site. We are always on the lookout for new opportunities and we believe in the power of win-win situations to improve life on this planet for all! Please don’t hesitate to Contact Us if you have any questions or want to talk about how our future plans may align.
The Platform
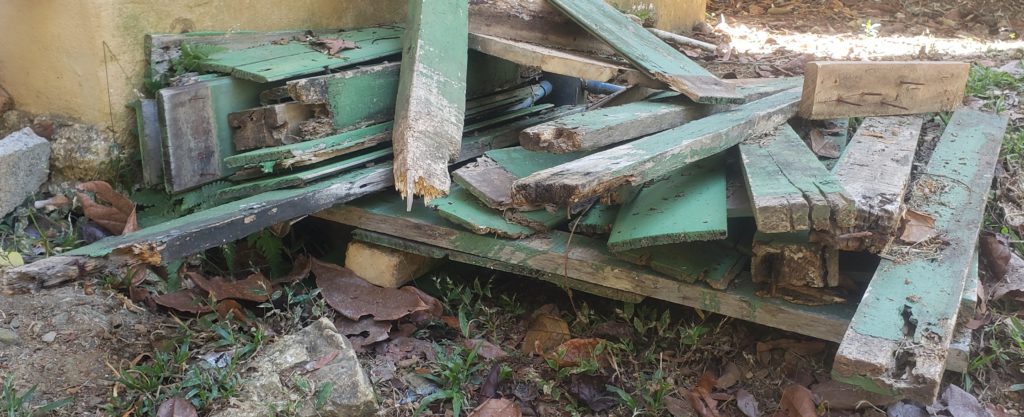
As I’ve mentioned in previous articles, we had tons of wood to repurpose on the property when we first arrived back in October. Among the candidates were several of these awesome platforms that were already nailed or screwed together and had a thin layer of concrete poured over them. That meant that they were less susceptible to termite infestation and general decay than some of the other wood we had lying around.
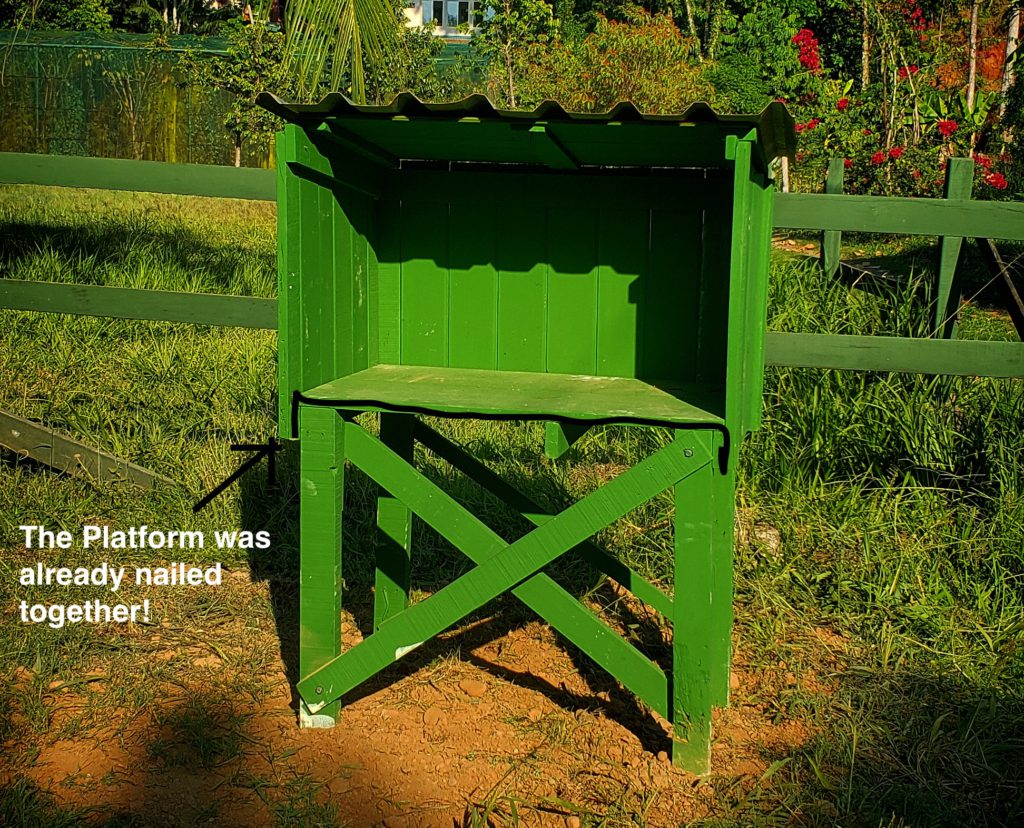
I selected one of these platforms that seemed to be an appropriate size for our new basurero. If I recall correctly, the dimensions ended up being about 36 inches across by 20 inches deep. It was the perfect starting point for the area that now holds our trash once a week and recycling once a month.
It’s important to mention that, throughout this process, I was sanding and then painting the required lumber before actually screwing anything together. While this slowed the process down a bit, I wanted to make sure that all the wood was adequately protected from the dust and rain that it will be exposed to out on the street. It is still my goal to go back and apply a thin layer of varnish to the entire surface area in order to further weatherproof the basurero.
The Base
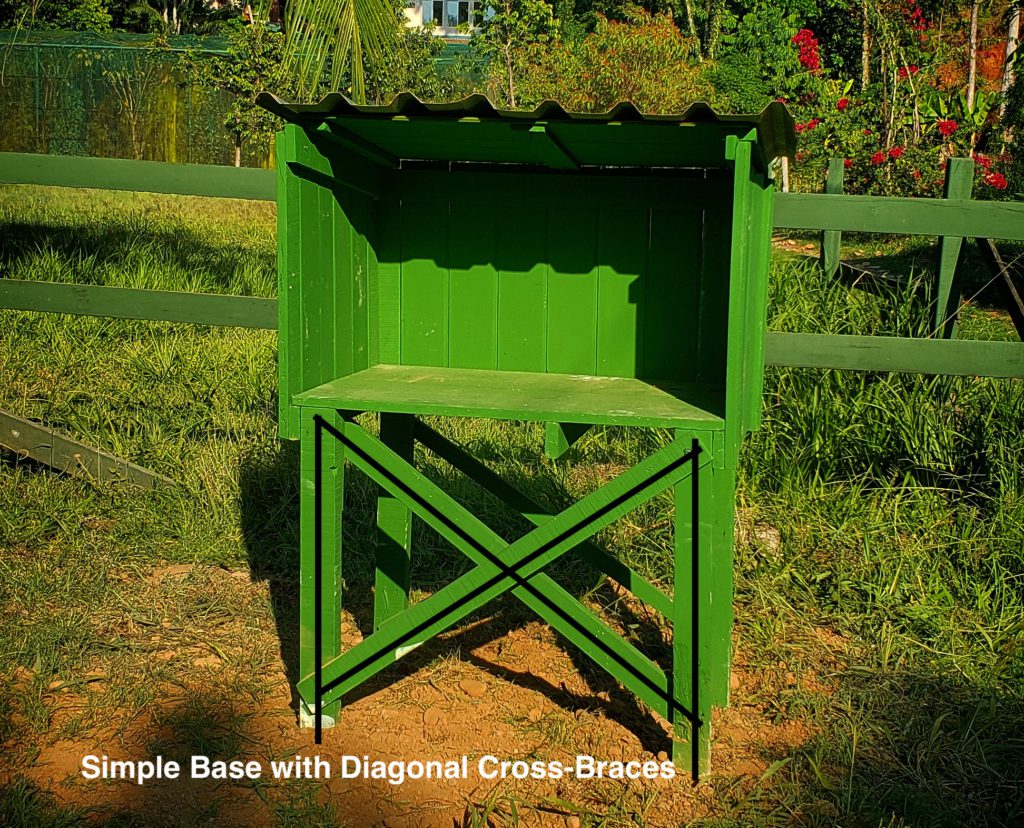
Not too many surprises here. I found four solid two-by-fours and cut them to my desired height. Then I placed two three-inch screws down through the platform and into each of the legs. Next, I cut the angled braces that you see in the photo and secured them to provide a bit more lateral strength.
The Walls
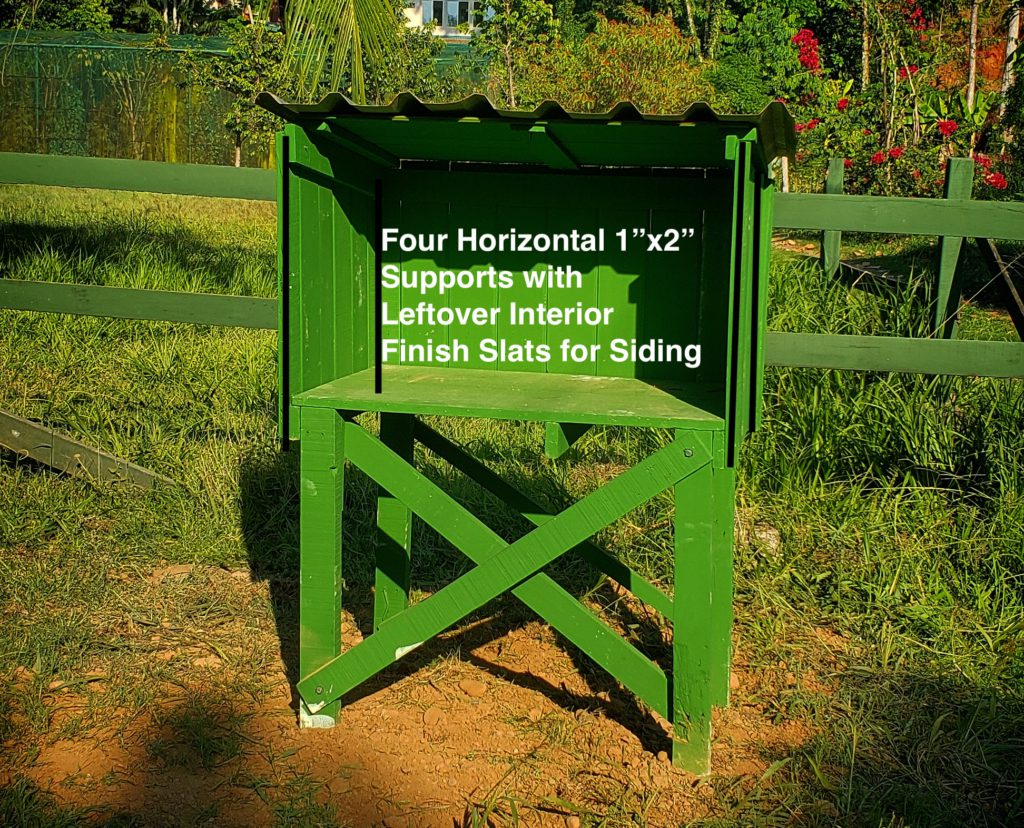
Next, I found four one-by-twos and cut them to my desired length. I kept the two pieces that I wanted to use on the front side of the basurero longer than the ones in the back so that I could later install the slanted roof. Once these four pieces were cut, sanded, and painted, I screwed them into the platform and base.
The thin slats of leftover interior roofing finish that I used for the basurero’s siding were actually the last things that I installed once we set the entire structure in the ground. Because I lacked the proper screws by that point (and was doing my best to stick to the “use existing resources and spend as little as possible” strategy), I used small nails meant for interior finish work to secure these slats to the basurero’s exterior. I have the thought of getting back out there and reinforcing each with one-inch screws before we leave.
The Roof
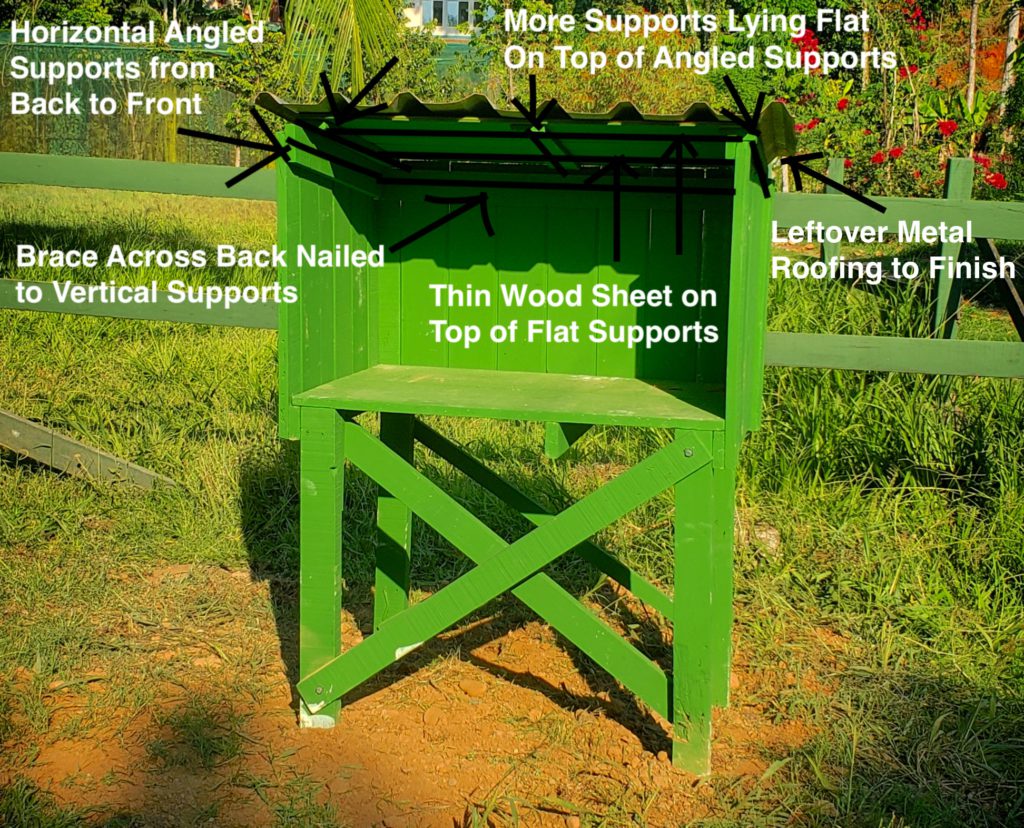
I wanted to give the leftover green metal roofing that I had decided to repurpose plenty of structure before I screwed it on. So, I started by connecting the two rear vertical supports with a horizontal one-by-two. Next, I ran two one-by-twos from back to front on either side, connecting the vertical supports to one another.
Moving up, I then laid two more one-by-twos flat on top of those pieces, running from back to front. Then, I put together the basic roof structure. This consisted of two larger wood planks connected by a one-by-two in the middle. Once connected, these planks formed the basis for support for the metal roofing and were installed by screwing either end into the flat one-by-twos on either end. Finally, I screwed the metal roofing on, being careful to use rubber gaskets on each screw to reduce the likelihood of leaks.
Setting It In the Ground
The last stage of the process was actually the demolition of the old basurero and the digging of footers to set the new one in. The old one was so rotted out that I practically leaned on it and it fell over. But, because it had been supported by concrete footers (and I didn’t really feel like digging them up), we actually had to change the location of our basurero slightly.
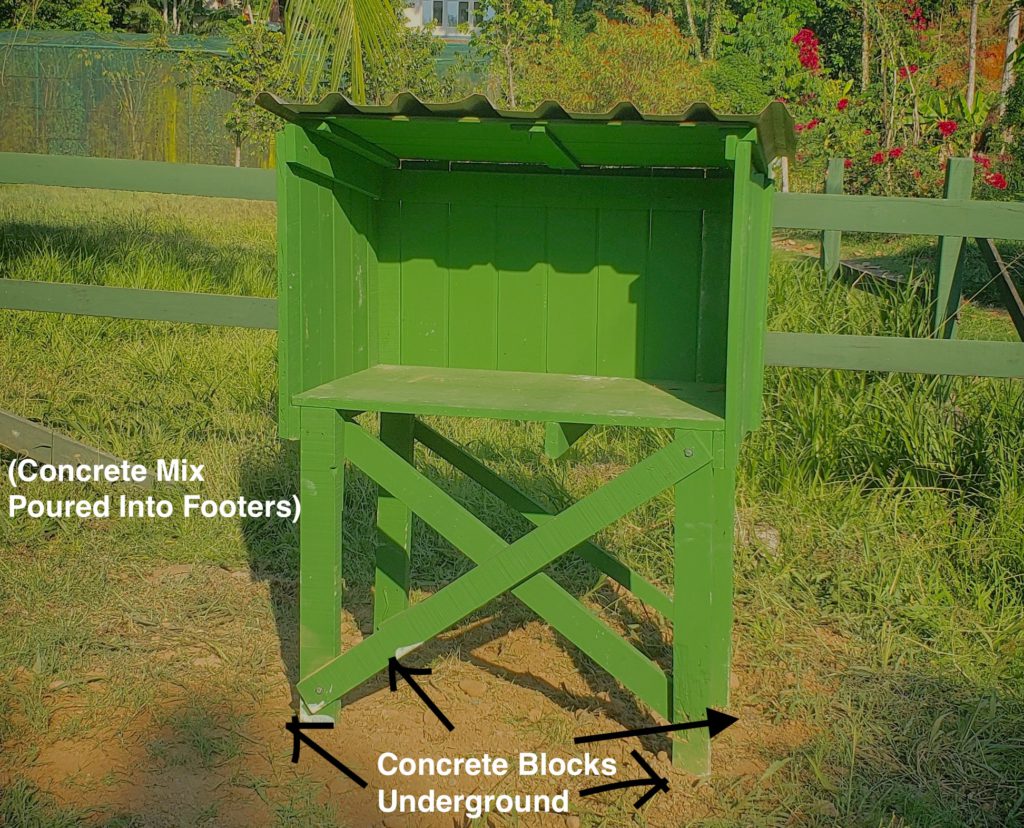
I dug a couple of trenches the width of the basurero in which we set four concrete blocks (one for each leg of the basurero). Once we set these blocks in place and leveled them, we carefully set the legs of the basurero into the blocks and then set about leveling the basurero itself. We got close and actually ended up tilting it slightly back to “hold” the trash in better (ha!).
Once the legs were set in the blocks and we had the entire structure as level as we wanted it, we used leftover mortar mix and poured that into each of the blocks and around the four legs of the structure. Once the concrete was poured, we actually wrapped each block in plastic for a day in order to slow down the curing process. From everything I researched and learned, slowing down this process actually helps the mortar to cure stronger. Later in the day, I went back and filled the trenches in and covered up the footers once the concrete was dried.
And Boom! A New Basurero!
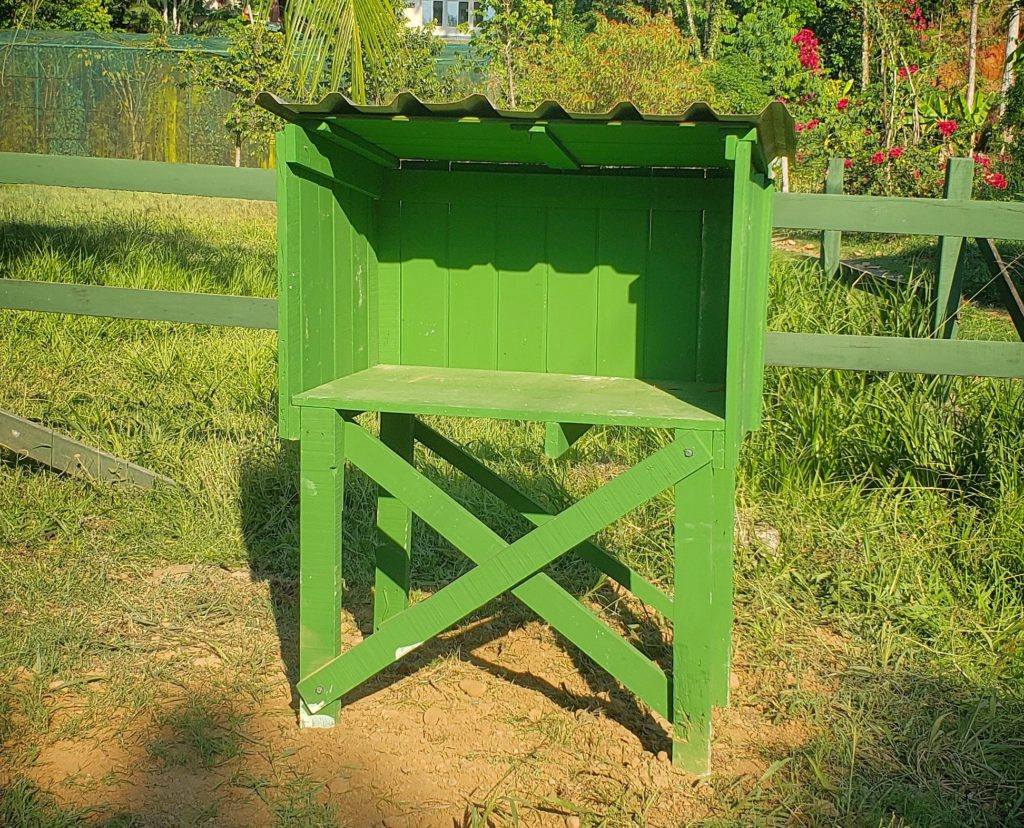
And that’s it! As I mentioned earlier, I still want to go back and apply a thin layer of varnish to the entire structure to protect it against rain and insects, but all-in-all I’d say it was a pretty quick and painless process. Now that it’s up, we’ve heard from several of our neighbors who are glad that there’s no longer an “eyesore” on our street in front of our property. I had also considered placing swinging doors with a latch on the front of the entire thing, but that’s something I’d need to double check is okay with the municipality before proceeding!
I hope you enjoyed this article on solving our trash problem and how we built a new basurero! If you have any questions, please don’t hesitate to reach out!
The Slow Life Guides

When we wrap up our time here in Costa Rica, we will be moving back stateside for the foreseeable future. After a spring road trip and some time in Lake Tahoe for the summer, we will be settling in Santa Cruz, California for the next four years as Katie pursues her degree in Traditional Chinese Medicine.
We would love an opportunity to help manage another Airbnb and work on property improvement projects like this one! If you’re interested in speaking to us about such an arrangement, shoot us an email to tucker@slowlifeguides.com or katie@slowlifeguides.com. We love the idea of leaving places better than we have found them and know that we can provide considerable value for the right property owner. If that’s you, we look forward to hearing from you!
Well this is just fantastic, well done you!
It looks great and certainly more aesthetically pleasing than the rubbish bins we have here in the uk.
You give a huge amount of info on how you built it and great photos to accompany that info.
Simple living certainly doesn’t have to mean trashy living, excuse the pun! not if you can make items like that!
I wonder how you might be thinking of recycling the wood from the old one?
Thanks for the comment and the positive feedback Louise! We are still toying with ideas for what to do with the wood from the old one, as it’s in pretty bad shape. One thought is to include it in our next hügelkultur project. The wood only had water-based paint on it and I’d just need to remove any leftover nails before tossing it into the trench and letting it decay!